Power Apps : Working with Tables with N:N (Many-to-Many) Relationships

What is Issue?

While working on Canvas Apps in PowerApps, how to deal with Dataverse Tables with N:N relationships ?

The Reason-

In PowerApps, while working with multiple Dataverse tables it is easy to write expressions/formulas with simple columns as well as 1:N (1-to-Many) relationships between tables. But when there are Dataverse tables with N:N (Many-to-Many) relationships, the intersecting table is not available to use directly.

Solution-

Let’s first understand Dataverse tables with N:N (Many-to-Many) relationship.

Suppose, we have 2 tables “Contact” and “Software Service”.

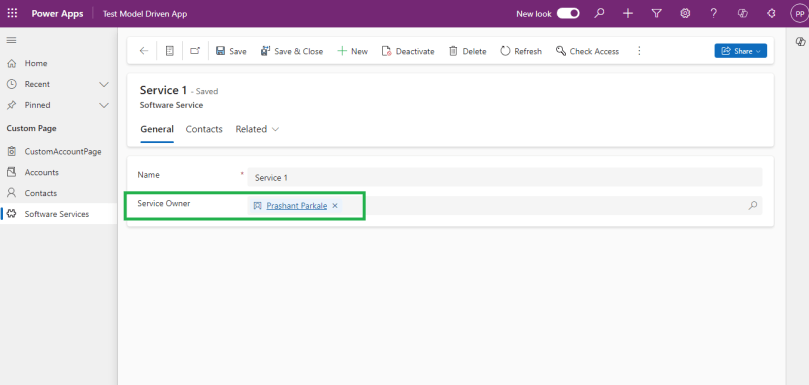
“Software Service” table have lookup “Service Owner” that creates 1:N (1-to-Many) relationship between “Contact” and “Software Service” tables.

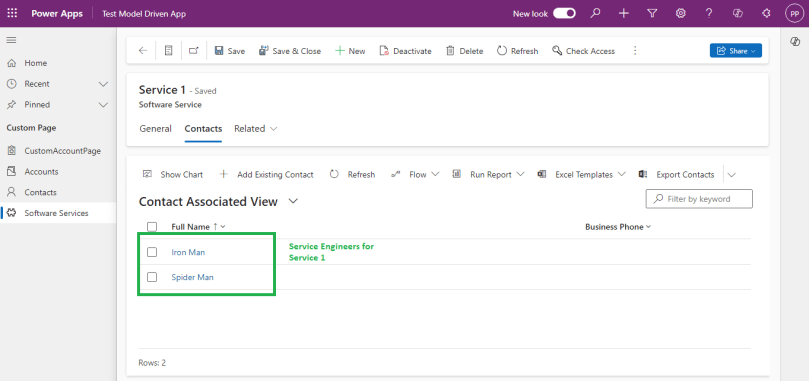
“Software Service” also needs multiple “Service Engineers”, So I have created N:N (Many-to-Many) relationship between “Software Service” and “Contact” tables.

Now I have scenario, In Canvas App I have to show list “Software Services” associated with “Contact” as either “Service Owner” or “Service Engineer”. And when it is “Service Engineer”, display his name in “Service Engineer” Column in the list else the “Service Engineer” Column will be blank.

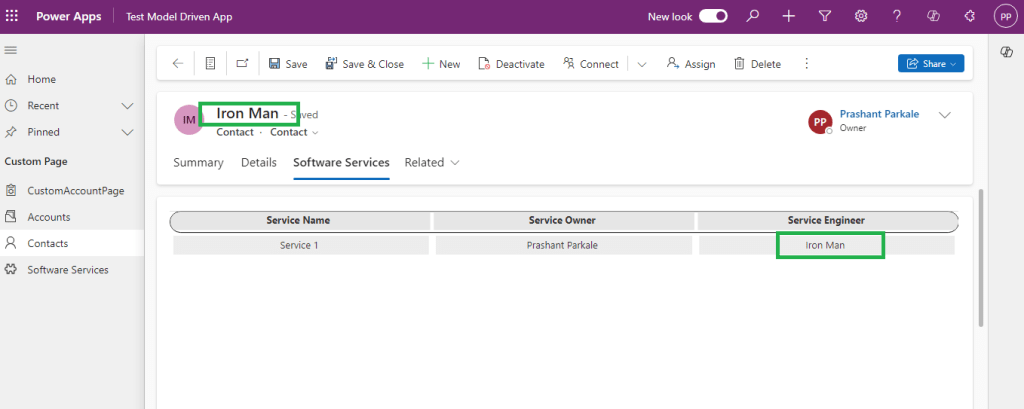
Suppose, “Service 1” is having “Prashant Parkale” (contact record) as added “Service Owner” and contact records “Iron Man” and “Spider Man” added as “Service Engineers”.

If I open “Prashant Parkale” contact record, It should list “Service 1” record with “Service Engineer” column as blank.

If I open “Iron Man” or “Spider Man” contact record, it should list “Service 1” record with “Service Engineer” column as respective contact record name.

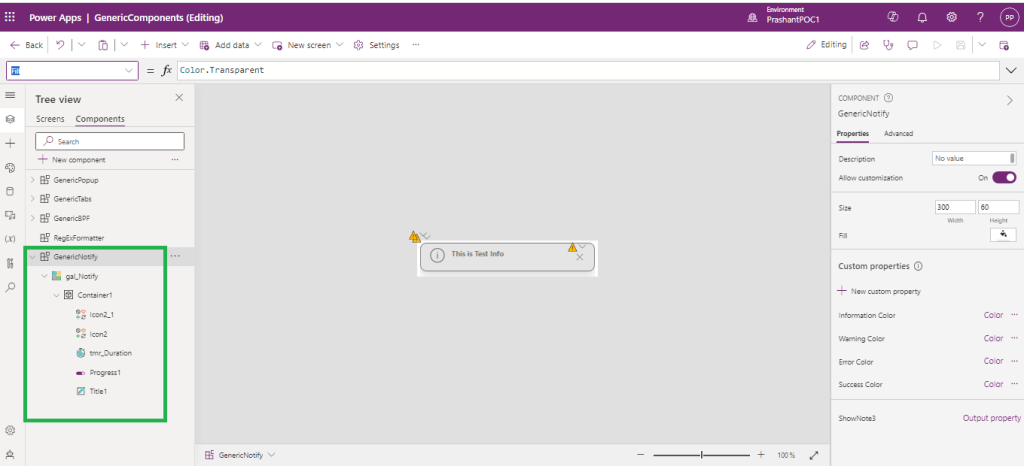
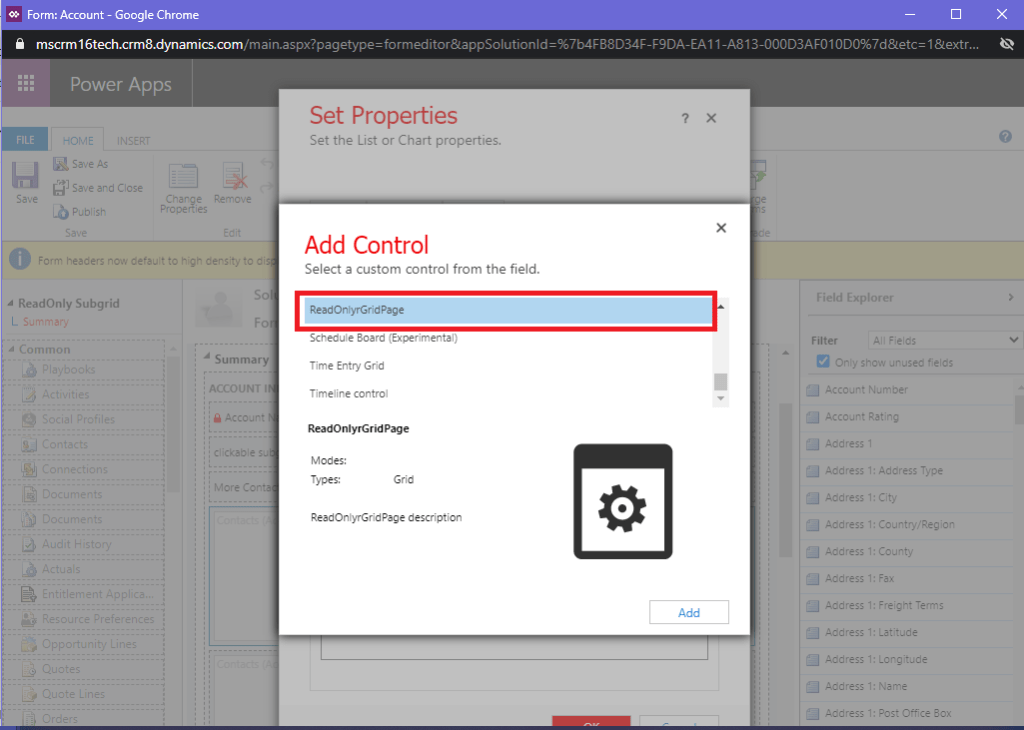
Let’s create Canvas App to embed in Contact form.

  • Create Canvas App with “ModelDrivenFormIntegration” enabled to get current contact record context.
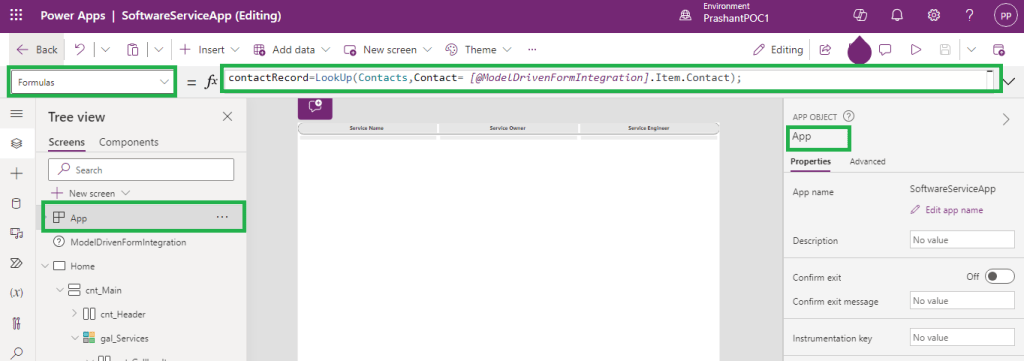
  • Define contactRecord variable in Formula in App.
contactRecord=LookUp(Contacts,Contact= [@ModelDrivenFormIntegration].Item.Contact);
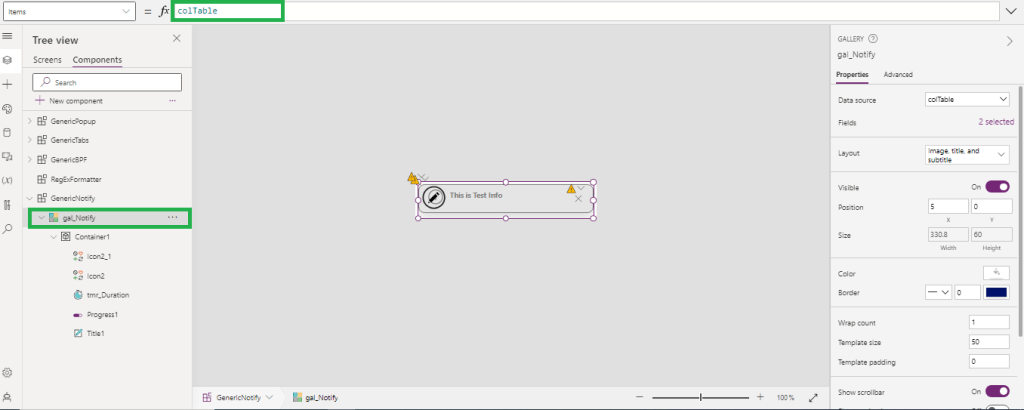
  • Add Gallery control in App Screen
  • Add below formula Items of Gallery control
Filter(
    'Software Services',
    Or(
        'Service Owner'.Contact = contactRecord.Contact,
        'Software Service' in Distinct(
            contactRecord.'Software Services (gen_SoftwareService_Contact_Contact)',
            'Software Service'
        )
    )
)
  • ‘Service Owner’.Contact = contactRecord.Contact will filter out “Software Service” Records where current contact record is added as “Service Owner”
  • contactRecord.’Software Services (gen_SoftwareService_Contact_Contact)’ is retrieving all the “Software Service” records related to current contact record with N:N (Many-to-Many) relationship gen_SoftwareService_Contact_Contact. This I am using as “Service Engineers”. But the fields are not directly accessible in the relationship. So utilizing the Distinct formula to list out all the “Software Service” Id to compare in Filter formula.
  • Please note- when you have to access “Software Service” N:N(Many-to-Many) records for Contact record it can be accessible as contactRecord.’Software Services (gen_SoftwareService_Contact_Contact)’ and if you have to access all contact N:N (Many-to-Many) records for “Software Service” record it can be accessible as serviceRecord.Contacts.
  • Above formula will list out all the “Software Service” records when current contact record when it is added as Service Owner or Service Engineer.
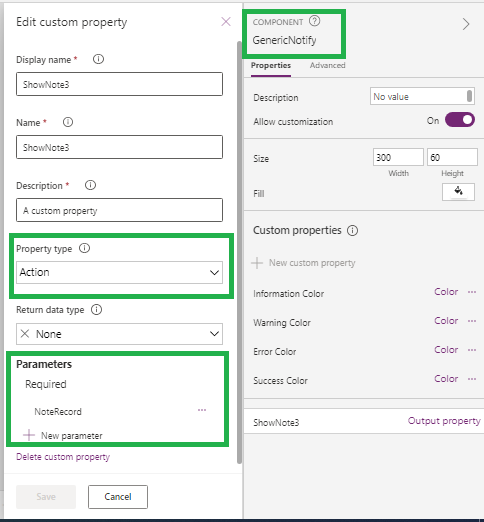
  • Now another requirement to display “Service Engineer” Name for “Software Service” when contact record is associated as “Service Engineer” in N:N (Many-to-Many) relationship.
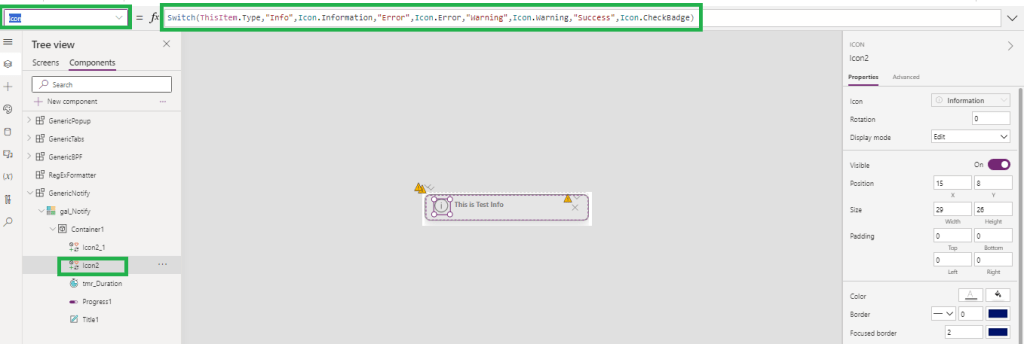
  • Add below formula in Text for “lbl_serviceEngineer” label added in Gallery control
If(
    contactRecord.Contact in Distinct(
        ThisItem.Contacts,
        Contact
    ),
    contactRecord.'Full Name',
    Blank()
)
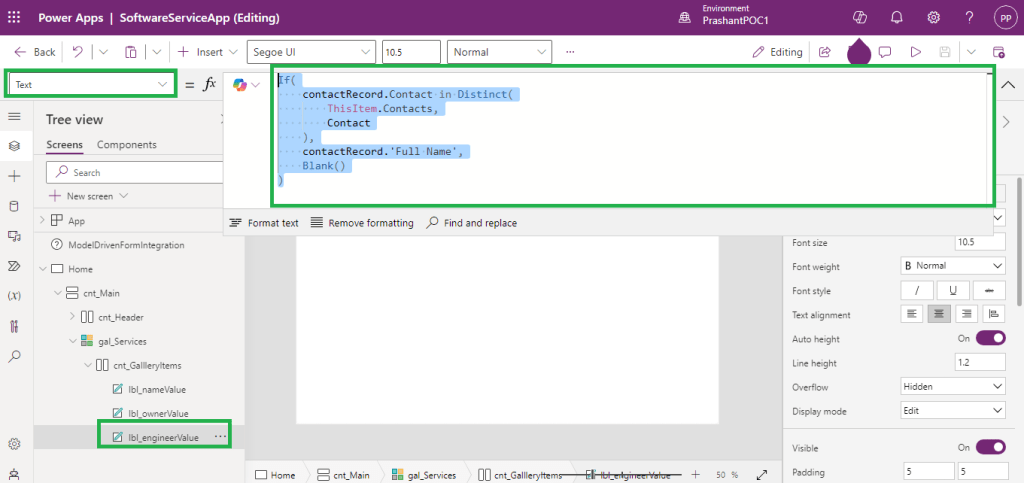
  • As explained in Gallery control Item formula, ThisItem.Contacts represents the all N:N (Many-to-Many) “Contact” records related to ThisItem, where ThisItem represent current “Software Service” record.
  • If current opened contact record is listed in all associated “Contacts” to “Software Service” (ThisItem), then show current contact record Full Name, else show blank.
  • In all above formulas, I have used Distinct formula to overcome inaccessibility of related record fields as well as any delegation errors in formula.

In above scenario, we learnt how to access related tables and use related table columns in regular formulas (using Distinct) when tables are in N:N (Many-to-Many) relationships.

Hope this will help…
Enjoy MS CRM!!!

Follow on Facebook- FB: MSCRM16Tech

Power Apps : Create Generic Notification in your own style and Replace OOB Notification

What is Issue?

Power Apps provides the way to display notification when some operation succeeded or there is any error, warning or just to show some information. We can use Notify() function which displays like banner on top of the app.

But sometime user don’t like this way to show notification. Is there any way to make it more fancy?

The Reason-

We can achieve the fancy Notification using multiple controls like containers, labels. But for each screen it will be repetitive task to implement this on each screen. How we can make it reusable, configurable and more generic?

Solution-

Power Apps has ability to create reusable components using Component Libraries or PCF controls. You can refer the this blog to create reusable Component Libraries.

Let’s see how we can leverage the Component Library and create custom Component.

Go to the Components Tab of your Power App in App Editor.

  1. Create new Component “GenericNotify”.
  2. Add Gallery
  3. Add Container in Gallery
  4. Add controls like Icons, timer, Label, etc. in Container.

Select GenericNotiy Component and add custom property (Name: ShowNote3, Type : Action) with required Parameter “NoteRecord”(Data Type : Record).

Set NoteRecord with JSON-

{Text:"This is Test Note",Type:"Info",Timeout:5000}

This will ensure the valid Record schema to be set from App where we are going to use this custom control.

On ShowNote3 custom property, collect the record received in parameter NoteRecord in collection. let’s say colTable.

Now, we have Collection and Collection schema that I can use in the gallery control.

Set the icon and Icon color based on the Notification Type.

For Icon-

Switch(ThisItem.Type,"Info",Icon.Information,"Error",Icon.Error,"Warning",Icon.Warning,"Success",Icon.CheckBadge) 

For Color, we can use the custom properties (Type: Input, Data Type :Color) of custom control. (InformationColor, WarningColor,ErrorColor,SuccessColor).

Switch(ThisItem.Type,"Info",GenericNotify.InformationColor,"Error",GenericNotify.ErrorColor,"Warning",GenericNotify.WarningColor,"Success",GenericNotify.SuccessColor)

It makes this notification more configurable from App.

To set timeout property of notification, use timer.

Set timer duration with current record timeout value-

If(ThisItem.Timeout>0,ThisItem.Timeout,1)

And onTimerEnd, notification should be vanished from screen. To do this, remove current record from collection colTable

If(ThisItem.Timeout<>-1, Remove(colTable,ThisItem))

On click of Cancel, Notification should be closed. Similar to OnTimerEnd, remove current record from collection colTable.

Remove(colTable,ThisItem);

Set the container color based on the Icon color(which is depends on the NotificationType of current record).

ColorFade(Icon2.Color,0.8)

Set Notification Text in lable (Title1 as shown in image) and set color similar to Notification Icon.

Text –

ThisItem.Text

Color –

Icon2.Color

After doing some basic setting on each control in custom control, save it and use it in app.

Add Custom Control in App and set the position where you want to show the notification.

  1. For Top-Left set X=5 and Y = 5
  2. For Top-Center Set X = (Parent.Width/2)-(Self.Width/2) and Y=5
  3. For Top-Right Set X= Parent.Width-Self.Width -5 and Y=5
  4. For Bottom-Left- X=5 and Y= Parent.Height-Self.Height-5
  5. For Bottom-Center X = (Parent.Width/2)-(Self.Width/2) and Y= Parent.Height-Self.Height-5
  6. For Bottom-Right X= Parent.Width-Self.Width -5 and Y= Parent.Height-Self.Height-5
  7. Height of the Control should be based on the number of Notification, so Height=52*CountRows(colTable) . 52 is Notification height.

In App, Call the ShowNote3 function and pass the record while calling function.

Suppose on Button onSelect event I want to show information.

GenericNotify_1.ShowNote3({Text:"This is Test Info",Type:"Info",Timeout:3000});

If you don’t want to hide notification automatically pass Timeout : -1

GenericNotify_1.ShowNote3({Text:"This is Test Info",Type:"Info",Timeout:-1});

Demoes below-

Top-Left
Top-Center
Top-Right
Bottom-Right

Now this Custom control can be reused in multiple screens and apps.

Hope this will help…
Enjoy MS CRM!!!

Follow on Facebook- FB: MSCRM16Tech

ReadOnly Subgrids in MS CRM

What is Issue?

While working on MS CRM projects I had requirement of readOnly subgrids in MS CRM. You can achieve this to some extent by hiding buttons on subgrids. But if the requirement is like links should not be clickable for some of the security roles or for some conditions, it is not possible using out-of-box subgrids. That time we had no other option than going with html and JavaScript web resources for this.

The Reason-

This can not be achieve using out-of-box subgrids controls.

Solution-

There are 2 solution for this-
1. Go with HTML webresource.
2. Create Your own Custom Control using PCF (PowerApps Control Framework)

I created the completely read-only subgrid with pagination functionality similar to out-of-box subgrid.

Taking my current scenario-
I have to make subgrid completely read-only if the “More Contact Required?”= NO
Or else the subgrid will be normal subgrid.

So what I did –

  1. On form I added 2 similar subgrids with different Names.
  2. Added script on change of “More Contact Required?” field to show required subgrid.
  3. Changed the control for subgrid which is visible when “More Contacts Required?”= NO
    Open Form Editor -> Select Subgrid -> Change Properties -> Controls Tab ->Add Control -> Selected my own custom Control ->ReadOnlySubgridPage -> Click Add
  4. Save Form and Publish.

Now I found it so simple as I can make any subgrid readonly with my custom control.

You can download the Solution from here and import in Dynamics 365 to use the control.

If you want to check source code download from here.

To work with source code you need some of the basic setup in your computer-
1. Nodejs installed
2. VS or Visual Studio Code installed
3.Understanding of below commands-

pac pcf init --namespace yourNamespace --name yourControlName --template dataset
npm install
npm run build
npm start
pac solution init --publisher-name yourPubliserName --publisher-prefix yourPrefix
pac solution add-reference --path "pcfproj folder path"
msbuild /t:restore
msbuild

Hope this will help…
Enjoy Ms CRM!!!

Follow on Facebook- FB: MSCRM16Tech

Color Picker Custom Control for MS Dynamics CRM

What is Issue?

One of my previous projects had requirement of color picker in MS CRM to provide users flexibility to select any color to can display notifications(using HTML) on their records. But we had no other option than going with html and JavaScript web resources for this.

The Reason-

MS CRM don’t provide any color picker field out-of-box.

Solution-

As I already had a blog written for color picker using web resources and spectrum libraries-Color Picker in MS CRM ?

But it is web resource which needs much efforts to match to field styles in crm.

I have created the custom pcf control (PowerApps Custom Control). This control can be used for the single line text fields.

Depends on browser it appears in supported way-

On Browsers other than IE-

This slideshow requires JavaScript.

In IE it will appear as –

This slideshow requires JavaScript.

If you want to use it you form you can download ready custom control from here-ColorPickerSolution.zip

How to use it-
1. Import downloaded solution in CRM-
ColorPicker5

2. Create single line of Text field in any entity you want and add it on form.
3. when adding to form select field, click on change field property and in controls tab add custom control “ColorPicker”-

This slideshow requires JavaScript.

4.Save and publish the form.
Now the control is available and ready on form to use.


You can also download the source code from here-ColorPickerSource.zip

To work with source code you need some of the basic setup in your computer-
1. Nodejs installed
2. VS or Visual Studio Code installed
3.Understanding of below commands-


pac pcf init --namespace yourNamespace --name yourControlName --template field
npm install
npm run build
npm start
pac solution init --publisher-name yourPubliserName --publisher-prefix yourPrefix
pac solution add-reference --path "pcfproj folder path"
msbuild /t:restore
msbuild

Hope this will help…
Enjoy Ms CRM!!!

Follow on Facebook- FB: MSCRM16Tech

Add floating Chat Bot (Microsoft Virtual Agent) on Power Portal (PowerApps)

What is Issue?

Microsoft is providing the Virtual Agents(chat bots) to provide the customers better communication ability on many channels like websites, Skype, Teams. Microsoft is also introduced the Power Portals. But how to integrate this Virtual Agent(chat bot) with Power Portal?

The Reason-

Power Portal provides the way adding the extra code snippet in portals. But when we try to embed the Virtual Agents in Power Portal using this code snippet it shows the chatbot window at the bottom of the portal. Code provided by Microsoft Virtual Agent after publishing is just an IFrame. So user is not able to see floating chat bot.

Solution-

To make your Virtual agent float you need some customized embed code with some JavaScript and CSS.
1. Create a CSS Style-sheet File with below CSS-

/* Button used to open the chat form - fixed at the bottom of the page */
.open-button {
background-color: #555;
color: white;
padding: 16px 20px;
border: none;
cursor: pointer;
opacity: 0.8;
position: fixed;
bottom: 23px;
right: 28px;
width: 280px;
}
.closePopUp{
display: block;
position: fixed;
bottom: 312px;
right: 50px;
border: 3px solid #f1f1f1;
z-index: 99;
width:30px;
height:30px;
background-color: transparent;
color:#f1f1f1;
}
/* The popup chat - hidden by default */
.chat-popup {
display: none;
position: fixed;
bottom: 0;
right: 15px;
border: 3px solid #f1f1f1;
z-index: 9;
height:350px;
}

This CSS will help to float chat bot at bottom left corner.

2.Add the saved CSS file to power portal –
Navigate -> make.powerapps.com ->Apps -> Select Portal-> Click on Edit

VAPowerPortal1

3.When Editor Opens -> Click on Themes and upload the CSS
VAPowerPortal2

Save the Code Editor and close the Portal editor.

4. Open the Portal Management Model-Driven App
VAPowerPortal3

5. Navigate to Content Snippet under Content and search for “Chat Widget Code”-
VAPowerPortal4
If you want you can create other Content Snippet of HTML type and add it on “Home” Web Template.

6. Open the Content Snippet-Chat Widget Code or newly created content snippet by you-

VAPowerPortal5

7. Add the Below code in Value as HTML and save the content snippet-


<script>
  function openForm() {
    document.getElementById("myForm").style.display = "block";
  }
  function closeForm() {
    document.getElementById("myForm").style.display = "none";
  }
</script><button onclick="openForm()" class="open-button">Chat</button><button onclick="openForm()" class="open-button">Chat</button>
  <div id="myForm" class="chat-popup">
[your iframe code as belows from Microsoft Virtual Agent after Publishing]  
   <button onclick="closeForm()" class="closePopUp">X</button>
</div>
<p></p>

8. replace [your iframe code as belows from Microsoft Virtual Agent after Publishing] in above code with something like below-

VAPowerPortal8

9. Load the portal again you will find Chat option at the right-bottom corner. When you click on chat button it will open your chat bot.

This slideshow requires JavaScript.

Hope this will help…
Enjoy Ms CRM!!!

Follow on Facebook- FB: MSCRM16Tech