Color Picker Custom Control for MS Dynamics CRM

What is Issue?

One of my previous projects had requirement of color picker in MS CRM to provide users flexibility to select any color to can display notifications(using HTML) on their records. But we had no other option than going with html and JavaScript web resources for this.

The Reason-

MS CRM don’t provide any color picker field out-of-box.

Solution-

As I already had a blog written for color picker using web resources and spectrum libraries-Color Picker in MS CRM ?

But it is web resource which needs much efforts to match to field styles in crm.

I have created the custom pcf control (PowerApps Custom Control). This control can be used for the single line text fields.

Depends on browser it appears in supported way-

On Browsers other than IE-

This slideshow requires JavaScript.

In IE it will appear as –

This slideshow requires JavaScript.

If you want to use it you form you can download ready custom control from here-ColorPickerSolution.zip

How to use it-
1. Import downloaded solution in CRM-
ColorPicker5

2. Create single line of Text field in any entity you want and add it on form.
3. when adding to form select field, click on change field property and in controls tab add custom control “ColorPicker”-

This slideshow requires JavaScript.

4.Save and publish the form.
Now the control is available and ready on form to use.


You can also download the source code from here-ColorPickerSource.zip

To work with source code you need some of the basic setup in your computer-
1. Nodejs installed
2. VS or Visual Studio Code installed
3.Understanding of below commands-


pac pcf init --namespace yourNamespace --name yourControlName --template field
npm install
npm run build
npm start
pac solution init --publisher-name yourPubliserName --publisher-prefix yourPrefix
pac solution add-reference --path "pcfproj folder path"
msbuild /t:restore
msbuild

Hope this will help…
Enjoy Ms CRM!!!

Follow on Facebook- FB: MSCRM16Tech

Add floating Chat Bot (Microsoft Virtual Agent) on Power Portal (PowerApps)

What is Issue?

Microsoft is providing the Virtual Agents(chat bots) to provide the customers better communication ability on many channels like websites, Skype, Teams. Microsoft is also introduced the Power Portals. But how to integrate this Virtual Agent(chat bot) with Power Portal?

The Reason-

Power Portal provides the way adding the extra code snippet in portals. But when we try to embed the Virtual Agents in Power Portal using this code snippet it shows the chatbot window at the bottom of the portal. Code provided by Microsoft Virtual Agent after publishing is just an IFrame. So user is not able to see floating chat bot.

Solution-

To make your Virtual agent float you need some customized embed code with some JavaScript and CSS.
1. Create a CSS Style-sheet File with below CSS-

/* Button used to open the chat form - fixed at the bottom of the page */
.open-button {
background-color: #555;
color: white;
padding: 16px 20px;
border: none;
cursor: pointer;
opacity: 0.8;
position: fixed;
bottom: 23px;
right: 28px;
width: 280px;
}
.closePopUp{
display: block;
position: fixed;
bottom: 312px;
right: 50px;
border: 3px solid #f1f1f1;
z-index: 99;
width:30px;
height:30px;
background-color: transparent;
color:#f1f1f1;
}
/* The popup chat - hidden by default */
.chat-popup {
display: none;
position: fixed;
bottom: 0;
right: 15px;
border: 3px solid #f1f1f1;
z-index: 9;
height:350px;
}

This CSS will help to float chat bot at bottom left corner.

2.Add the saved CSS file to power portal –
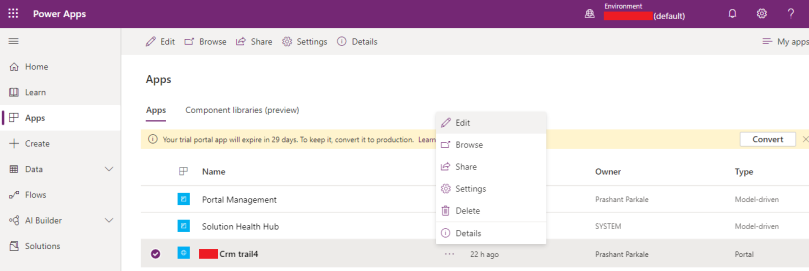
Navigate -> make.powerapps.com ->Apps -> Select Portal-> Click on Edit

VAPowerPortal1

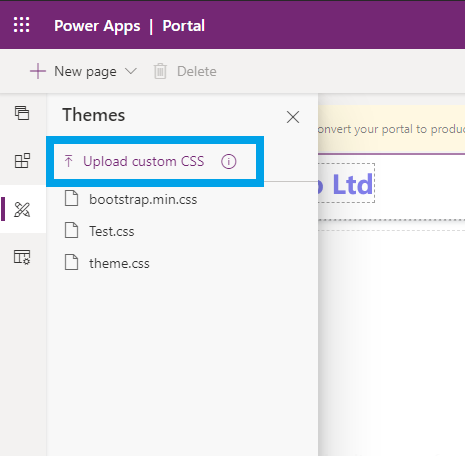
3.When Editor Opens -> Click on Themes and upload the CSS
VAPowerPortal2

Save the Code Editor and close the Portal editor.

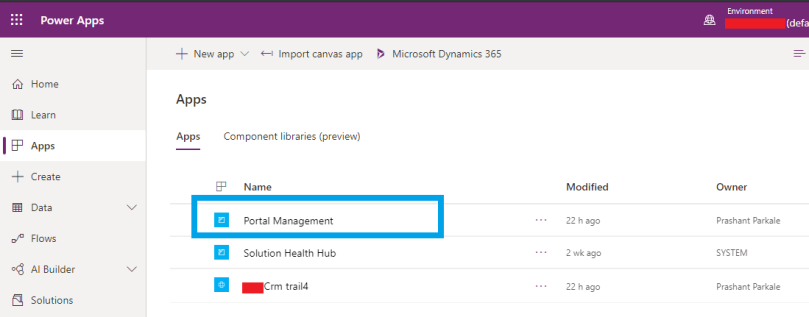
4. Open the Portal Management Model-Driven App
VAPowerPortal3

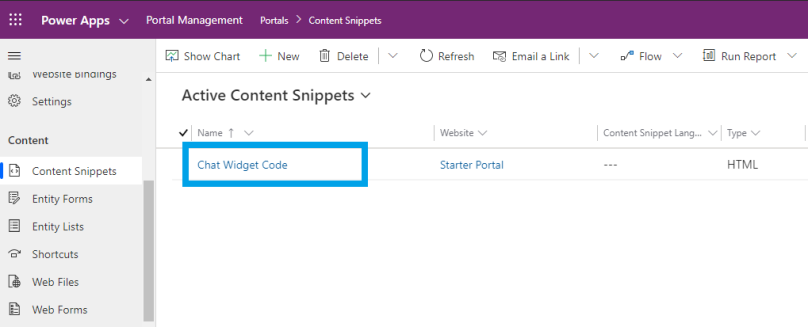
5. Navigate to Content Snippet under Content and search for “Chat Widget Code”-
VAPowerPortal4
If you want you can create other Content Snippet of HTML type and add it on “Home” Web Template.

6. Open the Content Snippet-Chat Widget Code or newly created content snippet by you-

VAPowerPortal5

7. Add the Below code in Value as HTML and save the content snippet-


<script>
  function openForm() {
    document.getElementById("myForm").style.display = "block";
  }
  function closeForm() {
    document.getElementById("myForm").style.display = "none";
  }
</script><button onclick="openForm()" class="open-button">Chat</button><button onclick="openForm()" class="open-button">Chat</button>
  <div id="myForm" class="chat-popup">
[your iframe code as belows from Microsoft Virtual Agent after Publishing]  
   <button onclick="closeForm()" class="closePopUp">X</button>
</div>
<p></p>

8. replace [your iframe code as belows from Microsoft Virtual Agent after Publishing] in above code with something like below-

VAPowerPortal8

9. Load the portal again you will find Chat option at the right-bottom corner. When you click on chat button it will open your chat bot.

This slideshow requires JavaScript.

Hope this will help…
Enjoy Ms CRM!!!

Follow on Facebook- FB: MSCRM16Tech